 admin1
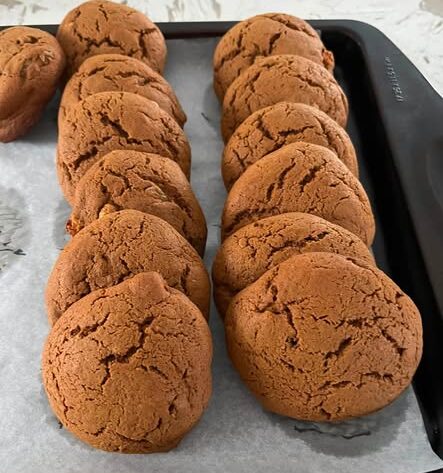
Rich, fragrant, slightly chewy, and beautifully soft, these Homemade Molasses Buns are a comforting old-fashioned bake with deep caramel-like flavor. Molasses gives the buns their distinctive dark color and warm sweetness, while butter and milk create a tender, fluffy interior.
Fresh from the oven, these buns have a wonderfully soft crumb and lightly crisp edges. They’re delicious served warm with butter, cream cheese, or simply enjoyed with a cup of tea or coffee.
This recipe is ideal for breakfast, weekend baking, holiday gatherings, or whenever you want a homemade sweet bun with a little more character than an ordinary dinner roll.
Why You’ll Love These Molasses Buns
- Soft and fluffy inside
- Rich molasses flavor
- Beautiful golden-brown exterior
- Simple pantry ingredients
- Perfect for breakfast or dessert
- Delicious warm from the oven
- Excellent with butter or cream cheese
- Freezer-friendly
- Great for holiday baking
Ingredients
Makes 10–12 buns
For the Dough
- 3 ½ cups (420 g) all-purpose flour
- 2 ¼ teaspoons active dry yeast
- ¼ cup (80 g) molasses
- 2 tablespoons granulated sugar
- 1 teaspoon salt
- ¾ cup (180 ml) warm milk
- ¼ cup (60 ml) warm water
- 1 large egg
- 4 tablespoons unsalted butter, melted
- 1 teaspoon vanilla extract
For the Topping
- 2 tablespoons melted butter
- 1 tablespoon molasses
- 1 tablespoon brown sugar
Optional Glaze
- ¾ cup powdered sugar
- 1–2 tablespoons milk
- ½ teaspoon vanilla extract
Preparation Information
Prep Time: 25 minutes
First Rise: 60–90 minutes
Second Rise: 30–45 minutes
Bake Time: 18–23 minutes
Total Time: Approximately 2 hours 30 minutes
Servings: 10–12 buns
Oven Temperature: 350°F (175°C)
Difficulty: Moderate
How to Make Molasses Buns
Step 1: Activate the Yeast
Pour the warm milk and warm water into a large mixing bowl.
The liquid should be comfortably warm, around 100–110°F (38–43°C), rather than hot.
Add the granulated sugar and active dry yeast.
Stir gently and let the mixture stand for approximately 5–10 minutes.
The surface should become slightly foamy, indicating that the yeast is active.
If nothing happens after about 10 minutes, your yeast may be inactive and should be replaced before continuing.
Step 2: Add the Wet Ingredients
Add the molasses, melted butter, egg, and vanilla extract to the yeast mixture.
Whisk until everything is thoroughly combined.
The molasses will give the mixture a deep amber-brown color.
Step 3: Add the Flour
Add approximately 3 cups of flour along with the salt.
Mix with a wooden spoon or dough hook until a sticky dough begins to form.
Gradually add the remaining flour, a little at a time.
You may not need every last tablespoon.
The dough should be soft and slightly tacky but not excessively sticky.
Avoid adding too much flour because this can make the finished buns heavy instead of fluffy.
Step 4: Knead the Dough
Transfer the dough to a lightly floured work surface.
Knead for approximately 7–9 minutes by hand.
Alternatively, use a stand mixer fitted with a dough hook and knead on low to medium-low speed for approximately 5–6 minutes.
The dough should become smoother and more elastic.
Shape it into a ball.
Step 5: First Rise
Lightly grease a large bowl.
Place the dough inside and turn it once so the surface is lightly coated.
Cover with plastic wrap or a clean kitchen towel.
Place the bowl somewhere warm and allow the dough to rise for approximately 60–90 minutes.
The dough should become noticeably larger and approximately double in volume.
The exact rising time depends on room temperature and yeast activity.
Step 6: Divide the Dough
Once the dough has risen, gently press it down to release excess air.
Transfer it to a lightly floured surface.
Divide it into 10–12 equal pieces.
For uniform buns, a kitchen scale can be useful.
Roll each portion between your palms to form a smooth ball.
Step 7: Arrange the Buns
Lightly grease a 9-inch round baking pan or similar baking dish.
Arrange the dough balls in the pan, leaving a little space between them.
As they rise, the buns will expand and eventually touch.
Cover the pan loosely with a kitchen towel.
Step 8: Second Rise
Let the shaped buns rise for approximately 30–45 minutes.
They should look noticeably puffy.
Avoid allowing them to rise too much, because overproofed dough can collapse during baking.
While the buns are rising, preheat the oven to 350°F (175°C).
Step 9: Prepare the Molasses Topping
In a small bowl, combine the melted butter, molasses, and brown sugar.
Stir until smooth.
Brush the mixture gently over the tops of the risen buns.
This creates a beautiful glossy surface and adds another layer of rich molasses flavor.
Step 10: Bake
Place the pan in the center of the preheated oven.
Bake at 350°F (175°C) for approximately 18–23 minutes.
The buns should be puffed and golden brown.
If you’re using a food thermometer, the center should reach approximately 190–200°F (88–93°C).
Try not to overbake them, as this can make the buns dry.
Step 11: Finish With Butter
Remove the buns from the oven.
Immediately brush the tops with a little melted butter.
Allow them to cool for approximately 10 minutes before serving.
For an extra-sweet finish, drizzle with vanilla glaze once the buns have cooled slightly.
How to Make the Vanilla Glaze
Place powdered sugar in a small bowl.
Add 1 tablespoon of milk and vanilla.
Whisk until smooth.
If the glaze is too thick, add a few drops of milk at a time.
If it’s too thin, add a little more powdered sugar.
Drizzle over the warm buns.
Tips for Perfect Molasses Buns
Use Fresh Yeast
Yeast is responsible for the fluffy texture, so make sure it is active and within its recommended use period.
Don’t Overheat the Milk
Milk that is too hot can damage the yeast.
Aim for warm rather than hot.
Measure Flour Carefully
Too much flour is one of the easiest ways to create dense buns.
If possible, weigh the flour using a kitchen scale.
Don’t Rush the Rise
The dough needs enough time to develop volume.
A warm, draft-free location will generally produce the best results.
Use Dark or Regular Molasses
Regular unsulfured molasses produces a pleasantly sweet and rich flavor.
Blackstrap molasses is much more intense and bitter, so it isn’t usually the best choice for a sweet bun unless you particularly enjoy its strong flavor.
What Do Molasses Buns Taste Like?
Molasses gives these buns a flavor that is deeper and more complex than ordinary sweet rolls.
You’ll notice:
- Caramel-like sweetness
- Warm earthy notes
- Mild bitterness
- Toasted sugar flavor
- Rich buttery aroma
The finished buns aren’t necessarily intensely sweet, making them suitable for both breakfast and serving alongside savory dishes.
Ways to Serve Molasses Buns
With Butter
Split a warm bun and spread it with salted or unsalted butter.
The butter melts into the soft crumb and creates a simple but delicious breakfast.
With Cream Cheese
Serve with softened cream cheese for a richer combination.
With Honey
A small drizzle of honey adds extra sweetness.
With Jam
Try strawberry, raspberry, blueberry, or orange marmalade.
With Coffee or Tea
The deep molasses flavor pairs particularly well with a hot cup of coffee or black tea.
Make-Ahead Instructions
You can prepare the dough the evening before.
After kneading, place the dough in a covered bowl and refrigerate overnight.
The cold environment slows yeast activity and allows the dough to develop flavor.
The next morning, allow the dough to sit at room temperature briefly, shape the buns, and let them complete their second rise before baking.
You can also shape the buns, cover the baking dish, and refrigerate them overnight. Allow them to become puffy before baking.
How to Store Molasses Buns
Store cooled buns in an airtight container at room temperature for approximately 2–3 days.
For longer storage, refrigerate them for up to 5 days, although refrigeration can make bread slightly firmer.
Reheat individual buns in the microwave for approximately 10–15 seconds or warm them in a 300°F (150°C) oven for several minutes.
Can You Freeze Molasses Buns?
Yes.
Allow the baked buns to cool completely.
Wrap them individually in plastic wrap or foil and place them in a freezer-safe container or bag.
Freeze for up to approximately 2–3 months.
Thaw at room temperature.
Warm them in a 300°F (150°C) oven for approximately 8–10 minutes before serving.
For the best texture, add the glaze after thawing rather than before freezing.
Nutrition Information
Approximate nutrition per bun when the recipe makes 12 buns and excludes optional glaze:
- Calories: 220
- Protein: 5 g
- Carbohydrates: 34 g
- Fat: 7 g
- Saturated Fat: 4 g
- Fiber: 1 g
- Sugar: 9 g
- Sodium: 230 mg
Nutrition values are estimates and vary depending on the exact flour, molasses, butter, milk, and serving size.
Frequently Asked Questions
Can I use blackstrap molasses?
Yes, but expect a much stronger, darker, and more bitter flavor. For a classic sweet bun, regular unsulfured molasses is generally preferable.
Why are my buns dense?
Dense buns can result from too much flour, inactive yeast, insufficient rising time, or an environment that’s too cold for the dough to rise properly.
Can I make these without eggs?
You can experiment with an egg substitute, but the texture may be slightly different. The egg contributes richness, moisture, and structure.
Can I use whole wheat flour?
You can replace some of the all-purpose flour with whole wheat flour. Start by replacing approximately 25–30% of the flour rather than substituting all of it, because too much whole wheat flour can make the buns heavier.
Can I make these buns less sweet?
Yes. Reduce the granulated sugar slightly, but keep the molasses because it provides both sweetness and the characteristic flavor of the recipe.