Fresh Gluten-Free Tortellini is a delicious homemade pasta that proves you don’t have to miss out on classic Italian comfort food when eating gluten-free. These tender pasta parcels are filled with a rich cheese mixture and wrapped in a delicate gluten-free dough that cooks up beautifully. Whether served in a light broth, tossed with butter and herbs, or coated in your favorite sauce, homemade tortellini is a rewarding kitchen project that delivers incredible flavor and texture.
Making tortellini from scratch may seem intimidating, but with the right gluten-free dough and a little patience, you’ll create restaurant-quality pasta right at home.
Why You’ll Love This Recipe
- Completely gluten-free
- Fresh homemade pasta texture
- Rich and creamy cheese filling
- Perfect for special occasions
- Freezer-friendly
- Authentic Italian-inspired flavor
- Customizable fillings
Preparation Time
- Prep Time: 45 minutes
- Rest Time: 30 minutes
- Assembly Time: 30 minutes
- Cooking Time: 3–4 minutes
- Total Time: Approximately 1 hour 50 minutes
Yield
4 servings (about 40 tortellini)
Ingredients
For the Gluten-Free Pasta Dough
- 2 cups (280 g) gluten-free all-purpose flour blend
- 1 teaspoon xanthan gum (omit if included in flour blend)
- ½ teaspoon salt
- 3 large eggs
- 1 tablespoon olive oil
- 2–4 tablespoons warm water as needed
For the Cheese Filling
- 1 cup (250 g) whole milk ricotta cheese
- ½ cup (50 g) grated Parmesan cheese
- ½ cup (50 g) shredded mozzarella cheese
- 1 egg yolk
- ¼ teaspoon garlic powder
- ¼ teaspoon black pepper
- Pinch of nutmeg
For Cooking
- Large pot of salted water
Equipment Needed
- Mixing bowls
- Rolling pin or pasta machine
- Sharp knife or pastry cutter
- Fork
- Small spoon
- Large pot
Instructions
Step 1: Make the Dough
In a large bowl, whisk together:
- Gluten-free flour
- Xanthan gum
- Salt
Create a well in the center.
Add:
- Eggs
- Olive oil
Mix until a shaggy dough forms.
Add warm water gradually until the dough comes together.
Step 2: Knead the Dough
Turn the dough onto a lightly floured surface.
Knead gently for:
3–5 Minutes
until smooth.
Unlike traditional pasta dough, gluten-free dough will not become highly elastic.
Step 3: Rest the Dough
Wrap the dough tightly.
Allow it to rest for:
30 Minutes
at room temperature.
This helps hydrate the flour and improves handling.
Step 4: Prepare the Filling
In a bowl, combine:
- Ricotta
- Parmesan
- Mozzarella
- Egg yolk
- Garlic powder
- Black pepper
- Nutmeg
Mix until smooth and creamy.
Refrigerate until ready to use.
Step 5: Roll Out the Dough
Divide dough into two portions.
Roll each portion very thin, approximately:
1⁄16 inch (1.5 mm)
thick.
Dust lightly with gluten-free flour as needed.
Step 6: Cut Squares
Cut the dough into:
2½-inch (6 cm) squares
Keep unused dough covered to prevent drying.
Step 7: Fill the Tortellini
Place about:
1 Teaspoon Filling
in the center of each square.
Lightly moisten edges with water.
Fold into a triangle and press edges firmly to seal.
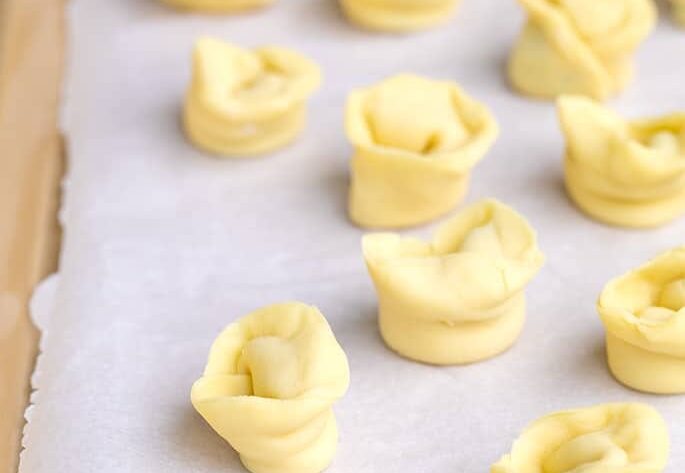
Step 8: Shape the Tortellini
Bring the two bottom corners of the triangle together around your finger.
Press gently to seal.
The classic tortellini shape should resemble a small ring.
Step 9: Cook
Bring a large pot of salted water to a gentle boil.
Water Temperature
212°F (100°C)
Cook tortellini for:
3–4 Minutes
or until they float and the pasta is tender.
Step 10: Serve
Drain gently and serve immediately.
Serving Suggestions
Fresh tortellini pairs beautifully with:
- Brown butter and sage
- Marinara sauce
- Alfredo sauce
- Pesto
- Parmesan cheese
- Light chicken broth
Tips for Perfect Gluten-Free Tortellini
Roll the Dough Thin
Thin dough creates delicate, authentic tortellini.
Keep Dough Covered
Gluten-free dough dries out quickly.
Don’t Overfill
Too much filling makes sealing difficult.
Seal Carefully
Press edges firmly to prevent leaks during cooking.
Filling Variations
Spinach Ricotta
Add:
- ½ cup cooked spinach
Mushroom Filling
Add:
- Finely sautéed mushrooms
Four Cheese
Use:
- Ricotta
- Parmesan
- Mozzarella
- Asiago
Herb Cheese
Add:
- Fresh basil
- Parsley
- Chives
Storage Instructions
Refrigerator
Store uncooked tortellini for:
Up to 24 Hours
covered and lightly floured.
Freezer
Freeze in a single layer until solid.
Transfer to freezer bags.
Store for:
Up to 2 Months
Cook directly from frozen.
Nutritional Information
Approximate per serving:
- Calories: 390
- Protein: 18 g
- Carbohydrates: 42 g
- Fat: 16 g
- Saturated Fat: 7 g
- Fiber: 3 g
- Sugar: 2 g
- Sodium: 420 mg
Values vary depending on flour blend and filling ingredients.
Frequently Asked Questions
Can I make the dough ahead?
Yes. Refrigerate wrapped dough for up to 24 hours.
Why is my dough cracking?
It likely needs a little more water or additional resting time.
Can I freeze tortellini?
Absolutely. Freeze before cooking for the best texture.
Do I need a pasta machine?
No. A rolling pin works perfectly, though a pasta machine makes rolling easier.