 admin1
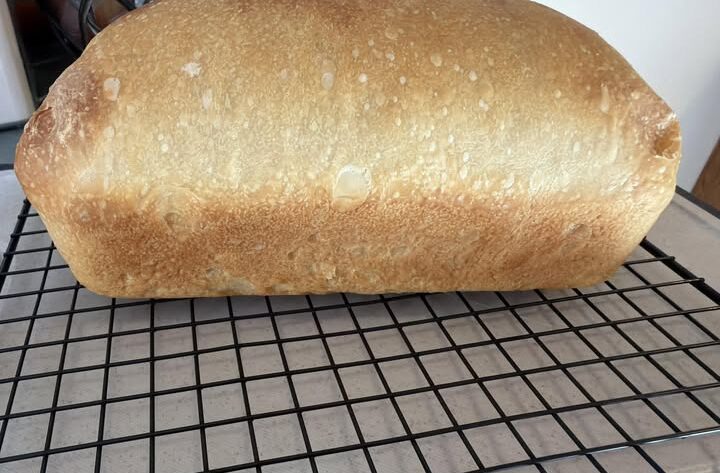
There is something special about homemade sourdough sandwich bread. With its golden-brown crust, soft interior, and delicious mild tang, this loaf is perfect for everyday sandwiches, breakfast toast, grilled cheese, and lunchbox favorites. Unlike many store-bought breads, homemade sourdough sandwich bread can be made with simple ingredients and a naturally fermented sourdough starter.
This sourdough sandwich loaf recipe is designed to produce bread that is soft enough for sandwiches while retaining the wonderful flavor of traditional sourdough. A little butter or oil helps create a tender crumb, while milk adds richness and softness. The dough is naturally leavened with an active sourdough starter, so commercial yeast is not necessary.
Although sourdough requires more time than quick yeast bread, most of the process involves resting and fermentation rather than active work. With a little planning, you can bake a beautiful loaf at home and enjoy fresh bread throughout the week.
Recipe Overview
- Preparation time: 25 minutes
- Initial rest: 30 minutes
- Bulk fermentation: 4–6 hours, depending on room temperature and starter activity
- Proofing time: 2–4 hours
- Baking time: 40–45 minutes
- Cooling time: At least 2 hours
- Total time: Approximately 9–13 hours, including resting and cooling
- Oven temperature: 190°C (375°F)
- Yield: 1 standard loaf, approximately 12–14 slices
- Difficulty: Intermediate
- Dietary notes: Vegetarian; contains gluten and dairy when made with the ingredients listed below
Fermentation times are estimates. Your dough may rise faster in a warm kitchen and slower in a cool one.
Ingredients for Sourdough Sandwich Loaf
This recipe uses everyday baking ingredients to make a tender, flavorful sandwich loaf.
- 500 g bread flour
- 100 g active sourdough starter, fed and bubbly
- 250 g lukewarm milk
- 30 g softened unsalted butter
- 20 g sugar or honey
- 10 g salt
- A little butter or oil for greasing the loaf pan
Ingredient notes
Bread flour: Bread flour contains enough protein to develop the gluten structure needed for a well-risen loaf. All-purpose flour can work, although the bread may be slightly less chewy or structured.
Active sourdough starter: Use a starter that has been fed and is bubbly, active, and rising reliably. A starter that has recently peaked generally gives more predictable fermentation.
Milk: Milk helps produce a softer crumb and a lightly golden crust. Use lukewarm rather than hot milk so you do not damage the starter’s microorganisms.
Butter: Butter improves flavor and tenderness. Softened butter is easier to incorporate into the dough.
Sugar or honey: A small amount adds subtle sweetness and helps with browning. It does not make the bread taste like cake.
Salt: Salt enhances flavor and helps regulate fermentation. Measure it carefully for consistent results.
Step-by-Step Instructions
Step 1: Prepare the dough
In a large mixing bowl, combine the active sourdough starter, lukewarm milk, and sugar or honey. Stir until the starter is mostly dispersed in the liquid.
Add the bread flour and mix until no large patches of dry flour remain. The dough may look rough and slightly sticky at this stage. Cover the bowl and let it rest for approximately 30 minutes.
This resting period allows the flour to absorb moisture and makes the dough easier to knead.
Step 2: Add the butter and salt
Add the salt and softened butter to the dough. Knead by hand for approximately 8–12 minutes, or use a stand mixer fitted with a dough hook for about 6–8 minutes on low to medium-low speed.
The dough should gradually become smoother, more elastic, and easier to handle. It may remain slightly tacky, which is normal.
Avoid adding too much extra flour. Excess flour can make the finished sandwich bread dry and dense. If the dough is very sticky, allow it to rest for a few minutes before continuing to knead.
Step 3: Begin bulk fermentation
Transfer the dough to a lightly greased bowl. Cover it with a lid, reusable cover, or clean kitchen towel.
Leave it at room temperature for approximately 4–6 hours, checking its progress regularly. In a warm kitchen, fermentation may finish sooner; in cooler conditions, it may take longer.
During the first two hours, you can perform two or three gentle sets of stretch-and-folds, spaced about 30–45 minutes apart. To do this, pull one side of the dough upward and fold it over the center, rotating the bowl as you work around the dough.
The dough should become smoother and more aerated. Look for a noticeable increase in volume, approximately 50–75% in many kitchens, rather than relying only on the clock.
Do not expect every sourdough dough to double during bulk fermentation. Over-fermentation can weaken the dough and make shaping difficult.
Step 4: Shape the sandwich loaf
Lightly flour your work surface and gently transfer the dough onto it. Press it into a rough rectangle, taking care not to squeeze out all the gas.
Fold the top third of the dough toward the center, then fold the bottom third upward. Roll the dough into a log, pinching the seam closed.
The finished log should fit comfortably into a greased standard loaf pan measuring approximately 9 × 5 inches (23 × 13 cm).
Place the dough seam-side down in the pan. Gently adjust its position so the loaf has an even shape.
Step 5: Proof the dough
Cover the loaf pan and allow the dough to proof for approximately 2–4 hours at room temperature.
The dough should become noticeably puffy and rise toward or slightly above the rim of the pan, depending on your pan size and dough strength. When gently pressed with a floured fingertip, the indentation should slowly begin to spring back.
If it springs back immediately, the dough may need more time. If it collapses or feels extremely fragile, it may be over-proofed.
Sourdough proofing depends heavily on starter strength and room temperature, so watch the dough rather than following the clock alone.
Step 6: Preheat the oven
Preheat your oven to 190°C (375°F) for at least 20 minutes before baking.
Position a rack in the center of the oven. Make sure the oven is fully heated before placing the loaf inside.
For this soft sandwich-style bread, a conventional oven generally works well without added steam. The milk and butter help create a tender crust.
Step 7: Bake the loaf
Place the loaf pan in the preheated oven and bake for approximately 40–45 minutes.
The top should become golden brown, and the loaf should feel firm when gently tapped. If the top browns too quickly, loosely cover it with foil during the final part of baking.
For the most reliable result, check the center with an instant-read thermometer. The internal temperature should reach approximately 93–96°C (200–205°F).
Remove the pan from the oven and leave the bread in the pan for about 5–10 minutes. Carefully turn the loaf out onto a wire rack.
Step 8: Cool before slicing
Allow the loaf to cool completely for at least two hours before slicing.
Cutting into hot bread can compress the crumb and create a gummy texture because the interior is still setting. Once cooled, use a serrated bread knife to cut even slices.
Your finished loaf should have a soft interior, a delicate sourdough flavor, and a lightly crisp golden crust.
Time and Temperature Guide
| Stage | Recommended time or temperature |
|---|---|
| Initial dough rest | 30 minutes |
| Bulk fermentation | 4–6 hours, approximately 24–27°C room temperature |
| Final proof | 2–4 hours, depending on dough activity |
| Oven temperature | 190°C (375°F) |
| Baking time | 40–45 minutes |
| Internal bread temperature | 93–96°C (200–205°F) |
| Cooling time | At least 2 hours |
These are practical starting points, not strict rules. Fermentation is controlled by the dough’s condition, starter activity, and ambient temperature. A cooler kitchen may require considerably more time.
Tips for the Softest Sourdough Sandwich Bread
Use a lively starter. A healthy, active starter is essential for good rise and flavor. If your starter is sluggish, the dough may need more time or may not rise sufficiently.
Measure ingredients accurately. A kitchen scale is more reliable than measuring flour by cups. Too much flour can make the loaf dry, while excess liquid can make shaping difficult.
Do not rush fermentation. The dough should look airy and feel expanded before shaping. If it remains dense, give it more time.
Shape with gentle tension. A well-shaped loaf holds its structure and rises evenly in the pan. Seal the seam carefully so the loaf does not open along the bottom.
Watch the final proof. Under-proofed bread can split along the sides, while over-proofed dough may collapse or produce a weak structure.
Let the loaf cool completely. Cooling is a necessary part of baking, not an optional extra. It helps the crumb set and makes neat slices easier.
Variations and Serving Suggestions
This sourdough sandwich loaf is versatile enough for sweet and savory meals.
- Whole-wheat version: Replace up to 100 g of bread flour with whole-wheat flour. You may need a little extra milk because whole-wheat flour absorbs more water.
- Seeded loaf: Add one to two tablespoons of sesame, sunflower, or pumpkin seeds during kneading.
- Honey sandwich bread: Use honey instead of sugar for a gentle sweetness.
- Herb bread: Add a small amount of dried rosemary, oregano, or mixed herbs for a savory loaf.
- Breakfast toast: Serve toasted slices with butter, jam, peanut butter, or scrambled eggs.
- Lunch sandwiches: Use the bread for cheese sandwiches, chicken salad, egg sandwiches, or fresh vegetable fillings.
- Grilled cheese: The soft crumb and buttery flavor work especially well with melted cheese.
If you add seeds or other ingredients, keep the overall dough consistency in mind. Large additions can change the texture and rise.
Storage and Freezing Instructions
Store the fully cooled loaf in an airtight bread bag or container at room temperature for approximately 3–4 days, depending on your kitchen conditions. Keep it away from direct sunlight and moisture.
For longer storage, slice the bread and freeze it in a freezer-safe bag for up to approximately 3 months for best quality. Separate slices with parchment paper if you want to remove only a few at a time.
Frozen slices can be toasted directly from the freezer. You can also thaw slices at room temperature before using them.
Avoid refrigerating bread unless necessary, as refrigeration can make it stale more quickly. If you notice mold, discard the affected loaf rather than simply removing the visible spot.
Nutrition Information
The following values are estimates based on the listed ingredients and a loaf cut into 14 slices. Actual nutrition varies with the type of milk, flour, starter, and slice size.
| Nutrient | Approximate amount per slice |
|---|---|
| Calories | 145 kcal |
| Protein | 4.8 g |
| Carbohydrates | 25 g |
| Total fat | 3 g |
| Saturated fat | 1.5 g |
| Fiber | 0.8 g |
| Sugars | 2.5 g |
| Sodium | 260 mg |
These estimates assume the 100 g sourdough starter contains equal weights of flour and water and that the loaf is divided into 14 equal slices. The nutrition values are not laboratory-tested.
Frequently Asked Questions
Can I make sourdough sandwich bread without commercial yeast?
Yes. This recipe uses an active sourdough starter as its only leavening agent. It may take longer than bread made with commercial yeast, but it develops the characteristic sourdough flavor.
Why is my sourdough sandwich loaf dense?
Common causes include a weak starter, insufficient fermentation, too much added flour, or slicing before the loaf has cooled. Check that your starter rises reliably after feeding and allow the dough to become visibly aerated before shaping.
Can I prepare the dough overnight?
Yes. After some initial room-temperature fermentation, you can refrigerate the covered dough to slow fermentation. The exact timing depends on how active the dough is when refrigerated. Allow it to warm and continue proofing as needed before baking, and avoid letting it over-proof.
How do I make the crust softer?
Milk and butter already help soften the crust. After baking, brush the warm crust lightly with butter and let the loaf cool on a rack. Once fully cooled, store it in a sealed bread bag.
How do I know when the bread is done?
The crust should be golden brown, and the center should reach approximately 93–96°C (200–205°F). An instant-read thermometer is more reliable than judging color alone.
Can I use all-purpose flour?
Yes. All-purpose flour can work, although the dough may have a slightly different texture. Begin with the same liquid amount and adjust only if the dough feels unusually stiff or loose.