 admin1
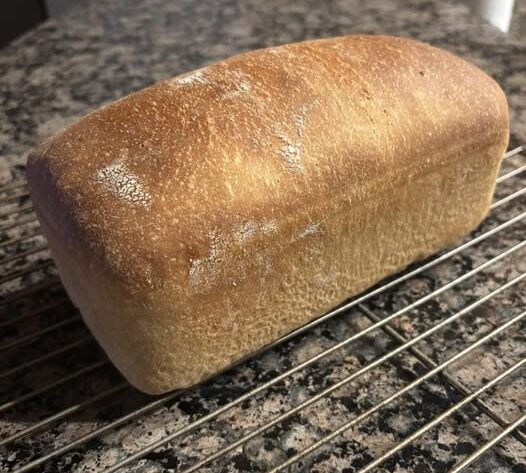
Nothing beats the aroma of freshly baked Sourdough Sandwich Bread filling your kitchen. This homemade loaf has a soft, tender crumb, a thin golden crust, and just the right amount of tangy sourdough flavor, making it perfect for sandwiches, toast, grilled cheese, French toast, or simply spread with butter. Unlike rustic artisan sourdough with its thick crust and open crumb, this sandwich loaf is designed to be light, sliceable, and ideal for everyday use.
Made with an active sourdough starter, bread flour, and a few simple pantry staples, this recipe uses natural fermentation to develop incredible flavor while creating a loaf that’s soft enough for lunchboxes yet sturdy enough to hold your favorite sandwich fillings. Whether you’re an experienced sourdough baker or just getting started, this recipe is reliable, rewarding, and well worth the time.
Why You’ll Love This Recipe
- Soft, fluffy sandwich-style texture
- Naturally leavened with sourdough starter
- Mild tangy flavor
- Thin, tender crust
- Perfect for sandwiches and toast
- No commercial preservatives
- Great for meal prep
- Freezes beautifully
Preparation Time
- Prep Time: 30 minutes
- Bulk Fermentation: 6–8 hours
- Shaping & Second Rise: 2–3 hours
- Bake Time: 40–45 minutes
- Cooling Time: 1 hour
- Total Time: About 10–12 hours (mostly hands-off)
Yield: 1 loaf (12–14 slices)
Ingredients
Dough
- 500g (4 cups) bread flour
- 100g (½ cup) active sourdough starter (100% hydration)
- 300ml (1¼ cups) warm water
- 30g (2 tablespoons) honey
- 30g (2 tablespoons) unsalted butter, softened
- 10g (2 teaspoons) fine sea salt
Optional Egg Wash
- 1 egg
- 1 tablespoon milk
Optional Topping
- Rolled oats
- Sesame seeds
- Poppy seeds
Equipment Needed
- Large mixing bowl
- Kitchen scale
- Stand mixer (optional)
- Dough scraper
- 9×5-inch loaf pan
- Plastic wrap or kitchen towel
- Cooling rack
- Instant-read thermometer
Step 1: Feed Your Starter
Use a healthy, active sourdough starter that has been fed 4–8 hours before baking and has doubled in size.
A bubbly, active starter ensures the best rise and flavor.
Step 2: Mix the Dough
In a large mixing bowl, combine:
- Active sourdough starter
- Warm water
- Honey
Stir until combined.
Add the bread flour and mix until no dry flour remains.
Let the dough rest for 30 minutes (autolyse).
After resting, add the softened butter and salt.
Knead by hand for 10–12 minutes, or with a stand mixer for 8–10 minutes, until the dough is smooth, elastic, and slightly tacky.
Step 3: Bulk Fermentation
Transfer the dough to a lightly greased bowl.
Cover and let rise at 72–75°F (22–24°C) for 6–8 hours.
Perform 3–4 stretch-and-folds during the first 2 hours, spacing them about 30 minutes apart. To do this, gently lift one side of the dough, stretch it upward, and fold it over the center. Rotate the bowl and repeat on all four sides. These folds strengthen the dough and help create a light, even crumb without intensive kneading.
The dough is ready when it has increased by about 50–75% in volume and feels airy.
Step 4: Shape the Loaf
Turn the dough onto a lightly floured surface.
Gently press it into a rectangle about the width of your loaf pan.
Roll the dough tightly into a log, pinching the seam closed after each turn.
Tuck the ends underneath to create a smooth shape.
Place the loaf seam-side down into a lightly greased 9×5-inch loaf pan.
Step 5: Second Rise
Cover the loaf loosely with plastic wrap or a kitchen towel.
Allow it to rise for 2–3 hours, or until the dough rises about 1 inch (2.5 cm) above the rim of the pan.
For a deeper sourdough flavor, refrigerate the shaped loaf overnight after about 30–60 minutes of room-temperature proofing. Bake it straight from the refrigerator the next day.
Step 6: Preheat the Oven
Preheat the oven to 375°F (190°C).
If using an egg wash, whisk together the egg and milk, then gently brush the top of the loaf.
Sprinkle with oats or seeds if desired.
Step 7: Bake
Bake for 40–45 minutes, or until the loaf is deep golden brown.
If the top browns too quickly, loosely cover it with aluminum foil during the last 10–15 minutes of baking.
The bread is fully baked when the internal temperature reaches 200–205°F (93–96°C).
Step 8: Cool
Remove the bread from the pan immediately after baking.
Place it on a wire rack and cool for at least 1 hour before slicing.
Cooling allows the crumb to finish setting and helps prevent gummy slices.
Serving Suggestions
This sourdough sandwich loaf is delicious with:
- Butter and jam
- Peanut butter and honey
- Avocado toast
- Turkey and Swiss sandwiches
- Grilled cheese
- Tuna salad
- Chicken salad
- Egg salad
- French toast
- Garlic toast
Expert Tips
Use an Active Starter
A lively starter that has recently doubled in size will produce the best rise and flavor.
Weigh Ingredients
Using a digital kitchen scale ensures consistent hydration and texture.
Don’t Rush the Fermentation
Sourdough develops its flavor over time. Allow the dough to ferment until it is airy rather than watching the clock alone.
Shape Tightly
A snug roll creates an even crumb and a tall sandwich loaf.
Cool Before Slicing
Resist cutting into the loaf while it’s hot. Cooling completely gives cleaner slices and better texture.
Delicious Variations
Honey Oat Sourdough
Mix ½ cup rolled oats into the dough and sprinkle additional oats on top before baking.
Whole Wheat Sourdough Sandwich Bread
Replace up to 30% of the bread flour with whole wheat flour for a nuttier flavor while maintaining a soft crumb.
Seeded Sourdough Loaf
Add sunflower seeds, flaxseeds, sesame seeds, and pumpkin seeds to the dough for extra texture and nutrition.
Herb and Garlic Sandwich Bread
Mix in 1 tablespoon chopped fresh rosemary, thyme, or parsley along with 2 teaspoons garlic powder.
Cheese Sourdough Loaf
Fold in 1 cup shredded cheddar, mozzarella, or Gruyère during the final minutes of mixing.
Cinnamon Raisin Sourdough
Add 1 teaspoon ground cinnamon and ¾ cup raisins for a lightly sweet breakfast loaf.
Make-Ahead Instructions
After shaping the loaf, cover it tightly and refrigerate overnight.
Bake directly from the refrigerator the next morning, adding 5–10 minutes to the baking time if needed.
Freezing Instructions
Whole Loaf
Allow the bread to cool completely.
Wrap tightly in plastic wrap followed by aluminum foil.
Freeze for up to 3 months.
Sliced Bread
Slice the loaf before freezing.
Place parchment paper between slices and store in a freezer-safe bag.
Toast individual slices directly from frozen.
Storage
- Room Temperature: Store in a bread bag or airtight container for up to 4 days.
- Refrigerator: Not recommended, as refrigeration can dry out the bread more quickly.
- Freezer: Up to 3 months.
To refresh the loaf, warm slices in a toaster or heat the whole loaf in a 325°F (163°C) oven for 8–10 minutes.
Frequently Asked Questions
Can I use all-purpose flour?
Yes, but bread flour is preferred because its higher protein content creates a stronger gluten structure and a softer, taller loaf.
Why didn’t my loaf rise much?
The most common reasons are an inactive starter, cool room temperature, or insufficient fermentation time. Make sure your starter is bubbly and doubles after feeding.
Do I need a loaf pan?
For a classic sandwich loaf with straight sides, a loaf pan is recommended. Free-form baking will produce a more rustic shape.
Can I add commercial yeast?
You can add 1 teaspoon instant yeast if you’re short on time, but doing so will reduce the distinctive sourdough flavor and natural fermentation benefits.
Why is my bread gummy?
A gummy texture usually means the loaf was underbaked or sliced before it had fully cooled. Always check for an internal temperature of 200–205°F (93–96°C) and let the bread cool completely before cutting.
Nutritional Information (Per Slice)
Approximate values based on 14 slices.
- Calories: 165
- Protein: 5g
- Carbohydrates: 31g
- Fat: 2.5g
- Saturated Fat: 1g
- Cholesterol: 3mg
- Sodium: 210mg
- Potassium: 65mg
- Fiber: 1g
- Sugar: 2g
- Calcium: 12mg
- Iron: 1.8mg